
Preparing the Area
Installing the Support Structure
Laying the Foundation
Framing the Screened-In Porch
Adding the Roof
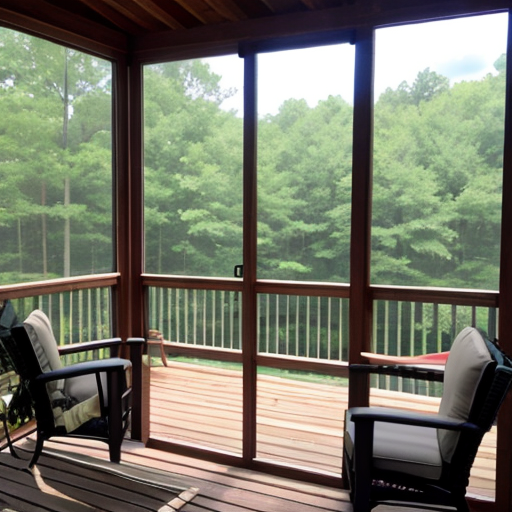
Installing Screens
Finishing Touches
Maintenance Tips
Conclusion
Transforming the unused space under your deck into a screened-in porch can be a game-changer for those who enjoy outdoor living without the annoyance of bugs and the harsh elements. This practical extension of your living space offers a unique combination of fresh air and comfort, providing an ideal setting for relaxation, dining, or entertaining guests. This guide will walk you through the essential steps of creating your own serene retreat right under your existing deck. From initial planning to the final touches, we'll help you navigate through the process with ease.
- Planning: We'll start by discussing how to plan your project effectively, considering factors such as size, location, materials, and budget.
- Preparation: You'll learn how to prepare the area under your deck, ensuring it's clean, level, and ready for construction.
- Construction: Step-by-step instructions on building the supporting structure, laying the foundation, framing, and roofing will be covered in detail.
- Screen Installation: We will provide you with expert advice on selecting and installing screens to keep out bugs while letting in the breeze.
- Finishing Touches: Once the structure is up, we'll share tips on wiring, lighting, and decorating to make your screened-in porch a cozy haven.
Our comprehensive guide is designed for DIY enthusiasts of all skill levels. Whether you're a seasoned builder or picking up a hammer for the first time, we'll support you every step of the way. Below is a quick reference table to summarize what you can expect from this undertaking:
| Project Stage | Key Activities | Materials Needed |
|---|---|---|
| Preparation | Cleaning, inspecting the deck, waterproofing | Cleaners, sealants, tools for inspection |
| Support Structure | Installing posts and beams | Lumber, concrete, fasteners |
| Flooring | Laying down the chosen material | Concrete, tiles, wood |
| Framing | Building walls and roof frame | Lumber, nails, hammer, saw |
| Roofing | Attaching roof panels | Roofing material, screws, drill |
| Screen Installation | Mounting screens to frames | Screens, spline, spline roller tool |
| Finishing Touches | Electrical, trim, decor | Wiring, lighting fixtures, furniture |
Planning Your Project

Effective planning is the cornerstone of any successful construction project. Before you start building your screened-in porch under the deck, you need to address several critical aspects to ensure your project runs smoothly and meets your expectations. In this chapter, we'll delve into the specifics of sizing, compliance, design, materials, and budgeting.
- Size and Location: Assess the available space under your deck and decide how much of it you want to convert into a screened porch. Consider the flow of traffic and the purpose of the space.
- Building Codes and Permits: Check with your local building authorities to understand the requirements and obtain the necessary permits. This is a crucial step to ensure your project is compliant and avoids legal issues.
- Design: Think about how you want the final project to look. Consider factors such as the direction of the breeze, the position of the sun, and the views you want to enjoy from your porch.
- Materials: Select materials that will complement your existing deck and house while also providing durability and ease of maintenance. You will need to decide on materials for the frame, screens, and any additional features like doors.
- Budgeting: Set a realistic budget that covers all materials, tools, and potential labor costs. Don't forget to account for any additional features or unexpected expenses that may arise.
To further assist with your planning, the table below breaks down key planning considerations and their details:
| Planning Consideration | Details to Consider | Notes |
|---|---|---|
| Size and Location | Dimensions, entry points, relation to garden/yard | Measure twice, plan entry to avoid high-traffic areas |
| Building Codes and Permits | Setbacks, height restrictions, railing requirements | Local codes vary, check with city/county regulations |
| Design | Orientation, roof style, screen type | Design for comfort and aesthetics |
| Materials | Wood, composite, aluminum, screen material | Choose for longevity and local weather conditions |
| Budgeting | Cost of materials, tools, permits, labor | Include a contingency for unexpected costs |
With the right planning, your screened-in porch will not only add value to your home but also provide a peaceful escape for years to come. Paying attention to these details in the planning phase will help prevent costly and time-consuming issues during construction.
Preparing the Area
Before you can start the exciting process of building your screened-in porch, the area beneath your deck requires careful preparation. This phase sets the groundwork for a stable and long-lasting structure. Below, we detail the steps to prepare your space effectively.
Cleaning the Space
Begin by clearing out any debris, furniture, or old fixtures under your deck. A clean workspace is essential for both safety and accuracy in construction.
Inspecting and Reinforcing the Deck Structure
Inspect the existing deck for any signs of damage or wear. Pay special attention to the joists and posts. Any compromised parts should be repaired or replaced to ensure the overall stability of the deck and the new porch.
Waterproofing and Sealing
Addressing moisture is critical in preventing rot and decay. Apply a waterproof sealant to the underside of the deck to protect the space below it from water damage.
- Debris Removal: Remove all objects that may obstruct construction or degrade the quality of your work area.
- Structural Assessment: Carefully evaluate the condition of the existing deck. Look for signs of rot, insect damage, or structural weakness.
- Waterproofing: Select and apply a high-quality sealant to the deck's underside to create a dry porch area.

Use the following table as a checklist to ensure you've covered all necessary preparation steps:
| Preparation Step | Actions | Materials and Tools Needed |
|---|---|---|
| Cleaning the Area | Clear debris and objects | Brooms, trash bags, gloves |
| Inspecting the Structure | Evaluate and repair | Flashlight, screwdriver (for probing), replacement materials (wood, screws, etc.) |
| Waterproofing | Seal the underside of the deck | Sealant, paint roller or sprayer, protective gear |
Thoroughly preparing the area is a vital step that should not be rushed. Taking the time to do this right will form a strong foundation for the screened-in porch and ensure that the structure is safe and enjoyable for many years to come.
Installing the Support Structure

Once the area beneath your deck is prepped and ready, the next step is to install a robust support structure for your screened-in porch. This framework will provide the necessary stability for your new outdoor space and needs to be constructed with precision and care.
Setting the Posts
Start by determining the locations for your support posts, which will depend on the size and shape of your porch. Use string lines and stakes to mark the exact positions, ensuring they are evenly spaced and square to the house.
Securing Beams and Joists
After the posts are set, attach horizontal beams along the top that will support the joists. These must be level and securely fastened to withstand weight and environmental stress.
Constructing the Floor Frame
The floor frame, composed of joists that span across the beams, provides the foundation for your porch flooring. Ensure that each joist is properly spaced and securely attached.
- Post Installation: Dig holes to the required depth for your support posts, set them in concrete, and ensure they are plumb and level as they set.
- Beam Attachment: Use heavy-duty bolts to attach beams to the posts. These will bear the load of the joists and must be installed correctly.
- Joist Installation: Attach joists to the beams using joist hangers or similar hardware designed for load-bearing applications.
The table below outlines the tools and materials you will need for this stage of the project:
| Installation Step | Tools Required | Materials Needed |
|---|---|---|
| Post Setting | Post hole digger, level, concrete mixer or tub | Concrete, posts, water |
| Beams and Joists | Screw gun or drill, wrench set, level | Beams, joists, joist hangers, bolts |
| Floor Framing | Saw, hammer, tape measure | Floor joists, nails or screws, framing square |
Correct installation of the support structure is essential for the longevity and safety of your screened-in porch. Don't rush this step, and ensure all components are securely fastened and compliant with local building codes.
Laying the Foundation

A solid foundation is imperative for the longevity and stability of your screened-in porch. This phase involves creating a level and durable base that can support the weight of the structure and resist the elements. Take your time to do this right, and you will enjoy a secure and long-lasting outdoor retreat.
Choosing the Right Foundation
The type of foundation you choose will depend on several factors including climate, soil type, and the existing deck structure. Options range from a concrete slab, which is ideal for its durability and low maintenance, to a pier and beam foundation that can be more suitable for areas with frost heave.
Preparation and Installation
Regardless of the foundation type, the area must be cleared and leveled. For concrete slabs, formwork will be constructed to hold the concrete in place as it sets. For pier and beam foundations, holes will be dug for the piers to be placed.
- Ground Preparation: Remove any sod and level the ground. For drainage, ensure the foundation slopes slightly away from the house.
- Formwork Construction: If laying concrete, build a form out of wood that matches the perimeter of your porch area.
- Concrete Pouring: For slab foundations, pour concrete into the form, spreading and leveling it as you go.
- Pier Setting: For pier foundations, set concrete piers in the ground, ensuring they are level and at the correct height.
The table below outlines the tools and materials needed for laying the foundation:
| Foundation Type | Tools Required | Materials Needed |
|---|---|---|
| Concrete Slab | Shovel, rake, hand tamper, level, wheelbarrow | Concrete mix, water, wood for formwork, rebar or mesh (if needed) |
| Pier and Beam | Post hole digger, level, concrete mixer or tub | Pre-cast piers or concrete, gravel |
Whether you opt for a concrete slab or a pier and beam foundation, make sure it complies with local building codes and is capable of supporting the designed load of your porch. A well-laid foundation ensures that the rest of your construction efforts are built on solid ground.
Framing the Screened-In Porch

The framing phase is where your screened-in porch really starts to take shape. This step involves constructing walls and a roof structure that will support the screens and any additional features such as doors or windows. Attention to detail during this stage will determine the overall appearance and strength of your porch.
Constructing the Wall Frames
Begin by measuring and cutting the lumber for the wall frames. Each wall frame will consist of top and bottom plates, studs, and possibly openings for doors or windows. Assemble the frames on the ground before erecting them in place.
Installing the Roof
If your porch design includes a separate roof, you'll need to construct rafters or trusses to support it. Make sure the roof structure is securely attached to the deck's existing structure and provides sufficient slope for water runoff.
- Wall Framing: Assemble the wall frames according to your porch design, making sure all frames are square and securely fastened together.
- Roof Support: Install any required beams or supports for the roof. These should align with the deck's existing structure for maximum stability.
- Installing Rafters/Trusses: Carefully place and secure rafters or trusses to the top of the wall frames or roof supports, maintaining even spacing throughout.
Below is a table detailing the tools and materials necessary for framing your screened-in porch:
| Task | Tools Required | Materials Needed |
|---|---|---|
| Wall Framing | Hammers, nails, saw, level, drill, square | Lumber (2x4s or 2x6s), nails or screws, metal connectors for openings |
| Roof Construction | Ladder, saw, hammer, nail gun, level | Rafters or trusses, roofing material, sheathing, fasteners |
With the framing in place, you can start to see your screened-in porch come to life. Ensuring that everything is plumb, level, and square during this phase is critical for a well-constructed porch that will withstand the elements and time.
Adding the Roof
With the frame of your screened-in porch established, the next critical task is to add the roof. This will not only provide shelter but also add to the overall structural integrity of the porch. The roof must be well-constructed to ensure it can bear the weight of environmental elements like snow or rain.
Securing the Roofing Frame
The roofing frame, which includes the rafters or trusses, should already be in place from the framing stage. These need to be double-checked to ensure they are secure and evenly spaced before adding the roofing material.
Choosing Roofing Materials
The choice of roofing materials will affect the longevity and appearance of your porch. Options include traditional shingles, metal roofing, or transparent panels for natural light. Consider the weight, durability, and how the roofing complements the existing structure of your house.
- Sheathing: Attach plywood or OSB panels to the rafters or trusses to form a solid base for the roofing material.
- Underlayment: Apply a waterproof underlayment over the sheathing to provide an extra layer of protection against moisture.
- Roofing Material: Install your chosen roofing material according to the manufacturer's instructions to ensure proper fit and seal.
Below is a table that provides an overview of the tools and materials you will need to add the roof to your screened-in porch:
| Component | Tools Required | Materials Needed |
|---|---|---|
| Sheathing Installation | Circular saw, nail gun or hammer, tape measure | Plywood or OSB panels, nails or screws |
| Waterproofing | Utility knife, tacker or staple gun | Waterproof underlayment, staples |
| Final Roofing | Hammer, roofing nails, ladder, safety harness | Shingles, metal panels, or other roofing material, roofing nails |
Remember, the roof is your defense against the elements, so take the time to install it properly. Ensure that all layers are secure and that the roofing material is correctly overlapped and sealed to prevent leaks.
Installing Screens
With the roof and frame in place, installing screens is the next step to encapsulate your porch and protect it from insects and debris while still allowing for airflow. Proper installation is crucial to ensure the screens are taut and secure.
Choosing Screen Material
Screen materials vary in durability, visibility, and insect protection. Fiberglass screens are popular due to their cost-effectiveness and ease of installation, while metal screens offer more durability. Consider the climate and the level of protection you need when selecting your screening material.
Screen Installation Process
Installing the screens involves attaching them to the frame of your porch and ensuring they are stretched tight to prevent sagging. Specialized screen frames can also be used to hold the screen material in place and allow for easy replacement in the future.
- Measuring: Accurately measure each opening to cut the screen material to size, leaving extra margin for adjustments.
- Fastening: Use a staple gun or screen tight system to secure the screens to the frame. Be sure to pull the material taut as you go to avoid wrinkles or sagging.
- Trimming: Once the screen is secured, trim any excess material for a clean look.
- Adding Trim: Install trim or molding over the screen edges to protect the material and give a finished appearance.
Below is a table summarizing the tools and materials necessary for installing screens:
| Task | Tools Required | Materials Needed |
|---|---|---|
| Screen Measurement and Cutting | Measuring tape, scissors or utility knife | Screen material, ruler or straight edge |
| Screen Attachment | Staple gun, screen tight system, spline roller tool | Staples, screen tight base and cap, spline |
| Trim Installation | Hammer, saw, nail gun | Trim or molding, finishing nails or brad nails |
Once installed, your screens will provide a barrier against insects and debris, turning your under-deck space into a comfortable, bug-free zone. Regular maintenance, such as checking for tears and keeping the screens clean, will help extend their life and functionality.
Finishing Touches
With the structure secure and the screens in place, your porch is nearly complete. The finishing touches will transform this functional space into an inviting retreat. Attention to detail during this final phase will ensure a professional and aesthetically pleasing result.
Sealing and Painting
Protecting your porch from the elements and giving it a polished look can be achieved by sealing and painting. Select a sealant and paint that are appropriate for outdoor use and compatible with your porch materials.
- Caulking: Seal all joints and crevices with caulk to prevent moisture from entering and to insulate against drafts.
- Painting: Apply primer if necessary, followed by your chosen paint. Consider using a paint sprayer for an even and efficient application.
- Staining: If you have wood elements, a stain can enhance the natural beauty of the wood and offer protection.
Installing Fixtures and Accessories
Add lighting, fans, or heaters to extend the usability of your porch into the evening and cooler seasons. Select fixtures that are rated for outdoor use to ensure safety and longevity.
- Lighting: Install wall-mounted, ceiling, or freestanding lights to create the desired ambiance and visibility.
- Fans/Heaters: Ceiling fans can provide air circulation, and outdoor heaters can warm the space on cooler days.
- Outlets: Ensure you have outdoor electrical outlets to power lights and other electronics.
Below is a table with a summary of the materials and tools for the finishing touches:
| Finishing Task | Tools Required | Materials Needed |
|---|---|---|
| Sealing and Painting | Caulk gun, paintbrushes, rollers, paint sprayer | Caulk, primer, paint or stain |
| Fixture Installation | Screwdriver, drill, wire stripper, ladder | Light fixtures, fans, heaters, mounting hardware |
| Electrical Outlets | Drill, screwdriver, voltage tester | Outdoor-rated electrical outlets, weatherproof covers, wiring |
With these finishing touches, your screened-in porch under the deck is ready for enjoyment. It’s a perfect place to relax and enjoy the outdoors without the inconvenience of pests. Regular maintenance will keep it looking fresh and inviting for years to come.
Maintenance Tips
Proper maintenance is key to ensuring your screened-in porch remains a comfortable and inviting space for years to come. Regular upkeep will prevent damage and reduce the need for costly repairs. Here are some essential maintenance tips to keep your porch in top condition.
Screen Care
Keeping the screens clean and intact is vital for your porch’s appearance and functionality. Inspect them regularly for any signs of damage.
- Cleaning: Gently clean the screens with a soft brush and mild soapy water to remove dust and grime. Rinse thoroughly with a garden hose.
- Inspection: Look for tears or holes in the screens that can allow insects to enter. Small holes can often be patched, while larger damage may require replacing the entire screen panel.
- Tightening: If screens become loose or saggy, they may need to be tightened or re-secured to the frame.
Structural Integrity
Examine the structural components of your porch periodically to ensure everything remains secure and stable.
- Wood Elements: Check for signs of rot or insect damage in any wood components, and replace or treat as needed.
- Hardware: Tighten any loose bolts or screws and replace any that have rusted or corroded.
- Roof: Inspect the roof for leaks or damage, especially after severe weather, to prevent water damage to the porch below.
Seasonal Preparation
Prepare your porch for the changes in season to protect it from weather-related damage.
- Winterizing: If you live in an area with cold winters, consider adding clear vinyl panels over the screens to keep the space warmer and protect it from snow and ice.
- Summerizing: Ensure all fixtures are working correctly and fans are clean to keep your porch cool during the hot summer months.
Below is a checklist table for routine maintenance:
| Maintenance Task | Frequency | Notes |
|---|---|---|
| Screen Cleaning | Bi-annual | Spring and Fall are ideal times for cleaning. |
| Structural Inspection | Annual | Check more frequently if you experience extreme weather. |
| Hardware Check | Annual | Replace as needed to ensure stability. |
| Seasonal Preparations | Bi-annual | Prepare for the specific needs of coming seasons. |
Regular maintenance will keep your screened-in porch looking great and provide a safe and pleasant outdoor space for relaxation and entertainment.
Conclusion
Building a screened-in porch beneath your deck can greatly enhance your outdoor living space, providing a bug-free environment to relax and entertain. By following the steps outlined in this article, from planning and preparation to the finishing touches and maintenance, you can ensure a successful project completion. Remember, while this can be a DIY project, certain aspects require expertise, precision, and safety considerations.
Should you find yourself in need of professional assistance, Atlantafencedeckspros.com is here to help. As a reputable company servicing Atlanta, GA, we offer a comprehensive range of services to ensure your screened-in porch is built to the highest standards. Our team of experienced professionals is equipped to handle all aspects of porch construction and maintenance, ensuring longevity and quality.
- Professional Services: Our team can provide expert construction, installation, and finishing services for your porch project.
- Quality Materials: We use only the best materials tailored to the Atlanta climate, ensuring durability and weather resistance.
- Expert Advice: Our professionals can offer guidance on design, materials, and maintenance to enhance your outdoor space.
If you are in the Atlanta area and considering adding a screened-in porch to your home, visit Atlantafencedeckspros.com or contact us for a consultation. We are dedicated to delivering excellence and customer satisfaction in every project we undertake.
Ready to Enjoy Your New Space
Once complete, your new screened-in porch will offer a perfect balance of indoor comfort and outdoor enjoyment. Regular maintenance will keep it a cherished space for many years. And remember, whether you're taking on this project yourself or seeking professional help, the result will be a serene and functional extension of your home that you can take pride in.
Thank you for considering Atlantafencedeckspros.com for your screened-in porch needs in Atlanta, GA. We look forward to helping you bring your vision to life.